
Wow, it’s been a hot minute. I don’t usually blog, but after starting a new role at Microsoft, I’ve been hitting the learning path hard. I’ve been quite familiar with docker for a while, but Kubernetes is something I’ve been sinking my teeth into the past couple months. After spinning up on-prem clusters at home, and after discovering that it’s not quite easy to set up load balancing on-prem, I was relieved after getting it working within Azure’s AKS. This is because standing up this type of environment up on-prem isn’t typical, as it’s a service that is reserved for cloud-hosted environments. Yes, MetalLB is one option, but I never got around to tinkering with it.
When specifying a service of type LoadBalancer within your manifest, out of the box within Azure you get a level-4 service, which means it’s not able to do advanced routing based on the HTTP request URL, for example. For that, you’ll need a level-7 Ingress controller, such as AGIC (which leverages Application Gateway), or in this case, the NGINX Ingress Controller.
In this post, I’ll demonstrate how to stand up a basic, dead-simple Nginx ingress controller with only a single route. No SSL/TLS certificate provisioning, no port forwarding, and no fluff – just the basics. I was referencing this page while teaching myself this, but since I learn best without noise, I broke it down a little more. From here, it’s easy to do things like mapping additional routes to other deployments or set up custom port forwarding. Not for this post, however.
Please note that is based around AKS, so I am not sure if this will work the same within other environments.
If you haven’t already, create your resource group, your Kubernetes cluster, and load/set the context by authenticating your Azure account. I’m creating a cluster named hellocluster inside a resource group named rg-hello-ingress. In addition, I’m optionally setting the infrastructure-related resources used by AKS inside a separate resource group named rg-hello-ingress-infra.
# create a resource group (be sure to set your location!)
az group create -n rg-hello-ingress

# create sample cluster/group
az aks create -n hellocluster -g rg-hello-ingress --node-resource-group rg-hello-ingress-infra

# authenticate and set the context
az aks get-credentials -g rg-hello-ingress -n hellocluster
Next, we need to add the Nginx ingress controller. This was done via Helm, and differs from the above Microsoft documentation in that omits the health check endpoint and uses the default namespace. The following code adds a reference to the local repository for the ingress chart, refreshes the repository, and installs the ingress-nginx/ingress-nginx chart.
# add the local chart repository named ingress-nginx
helm repo add ingress-nginx https://kubernetes.github.io/ingress-nginx

# update the local repository list
helm repo update

# install the chart from the repository
helm install ingress-nginx ingress-nginx/ingress-nginx
After running that, you should now see both ingress-related services and a deployment.
ryan@Azure:~$ kubectl get services
NAME TYPE CLUSTER-IP EXTERNAL-IP PORT(S) AGE
ingress-nginx-controller LoadBalancer 10.0.204.3 20.22.41.20 80:31264/TCP,443:30246/TCP 4h31m
ingress-nginx-controller-admission ClusterIP 10.0.176.164 <none> 443/TCP 4h31m
kubernetes ClusterIP 10.0.0.1 <none> 443/TCP 4h38m
ryan@Azure:~$ kubectl get deployments
NAME READY UP-TO-DATE AVAILABLE AGE
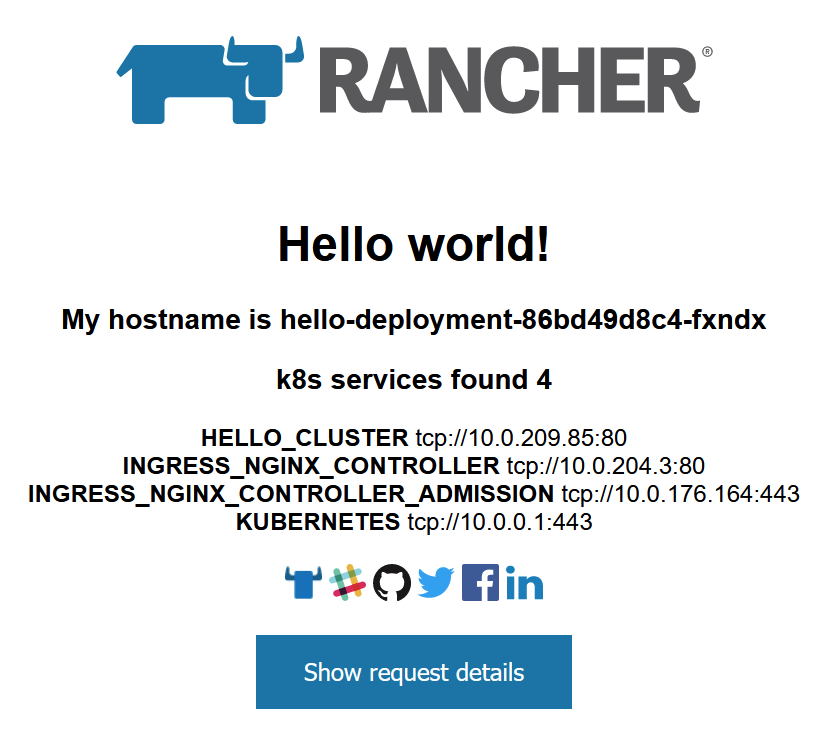
ingress-nginx-controller 1/1 1 1 4h31mNow that the Nginx ingress controller is running, we can deploy some containers! You can use any image you like, of course, but for simplicity, I’m running a simple container called rancher/hello-world that runs on port 80. If the container needed to run on a port other than 80, we would add the targetPort property to the manifest for the ClusterIP service (further below), but like I said: “no fluff.”
To get a basic deployment running with the ingress controller, we’ll need 3 main parts to our manifest. You can combine these as one single file, or for the sake of this instruction, leave them as 3. If you would like a combined, single YAML file of the 3 deployment sections, you may download it here: ingress-deploy-combined.yaml.
The first is the actual deployment for the application container. Since we’re using rancher/hello-world as our image, a basic deployment manifest will look like the following. Be sure to adjust the replicas value as needed. In this case, it will create 3 pods within your cluster.
apiVersion: apps/v1
kind: Deployment
metadata:
  name: hello-deployment
  labels:
    app: hello
spec:
  replicas: 3
  selector:
    matchLabels:
      app: hello
  template:
    metadata:
      labels:
        app: hello
    spec:
      containers:
      - name: hello
        image: rancher/hello-world
        ports:
        - containerPort: 80
Next, we’ll need to create a ClusterIP service, as this service is what the ingress controller will reference when routing requests to applications. This service manifest creates a simple ClusterIP service that references the “hello” application label from the deployment above.
apiVersion: v1
kind: Service
metadata:
  name: hello-cluster
spec:
  type: ClusterIP
  ports:
  - port: 80
  selector:
    app: hello
Finally, we’ll add the ingress service controller. This manifest only defines a root-level path, essentially forwarding ALL requests to the cluster we just created. Note the specification of the “hello-cluster” ClusterIP service we just created for the backend service in the rules list below.
Under the annotations section, the values for nginx.ingress.kubernetes.io/ssl-redirect and nginx.ingress.kubernetes.io/use-regex are explicitly set, because their default values are otherwise true and false, respectively.
I also did omit the line nginx.ingress.kubernetes.io/rewrite-target: /$2 because it was redirecting all requests to the root, instead of maintaining the relative path. I have not yet researched it further and am not sure the reason for including it in the original documentation.
apiVersion: networking.k8s.io/v1
kind: Ingress
metadata:
  name: hello-ingress
  annotations:
    nginx.ingress.kubernetes.io/ssl-redirect: "false"
    nginx.ingress.kubernetes.io/use-regex: "true"
    # nginx.ingress.kubernetes.io/rewrite-target: /$2
spec:
  ingressClassName: nginx
  rules:
  - http:
      paths:
      - path: /
        pathType: Prefix
        backend:
          service:
            name: hello-cluster
            port:
              number: 80
At this point, once the services and the deployment are complete, you should be able to open the external IP address for your ingress-nginx-controller service above and you should be greeted with the Rancher page!
Hope this helped!
And, while we’re at it, I’ll count this as day 5 #100DaysToOffload.
Leave a Reply